Wednesday, November 11, 2020

The BEST Homemade Monkey Bread

I recently made monkey bread (or pull-apart cinnamon bread it seems to have different names) and I forgot how much my kids LOVED it.

From the time I took it out of the oven, until the plate was completely empty was under 5 minutes. My kids devoured this!

While monkey bread is definitely not a healthy breakfast it is a fun breakfast to make for special occasions. It’s also so much easier to make than traditional cinnamon rolls and quicker too!

homemade monkey bread

Some people… who I personally believe are crazy, like to add things like nuts and raisins to this recipe. If someone tries to add raisins, run away as fast as you can. Those are not my people and they shouldn’t be your people either. I can kind of get on board with the nuts but my kids would revolt.

You can make this recipe from scratch, using homemade biscuits. But if I’m taking a short cut I’m taking a complete short cut! I use canned biscuits, get the store brand or whatever is cheapest.

You can use any kind, but the non flaky biscuits work best for monkey bread.

Best monkey bread
Print

Monkey Bread

This gooey cinnamon and sugar bread is a favorite on holiday mornings.
Course Breakfast
Cuisine american
Keyword breads
Prep Time 10 minutes
Cook Time 20 minutes
Servings 8 people
Cost $8

Equipment

  • Bundt pan

Ingredients

  • 2 cans biscuits
  • 2/3 cup sugar
  • 2 tsp cinnamon
  • 1 stick butter
  • 1/2 cup brown sugar

Instructions

  • Preheat oven to 350 degrees.
  • Spray bundt pan with nonstick spray.
  • Open cans of biscuits and cut each biscuit into four pieces (like you are cutting a pie or a pizza)
  • Take cinnamon and white sugar and combine in a small bowl.
  • Take each piece of biscuit dough and roll in the cinnamon sugar mixture until coated.
  • Place in the bundt pan. Continue until all the biscuit pieces have been used.
  • Sprinkle any remaining cinnamon and sugar mixture over the dough in the pan.
  • Melt the butter and stir in the brown sugar.
  • Pour over the biscuit dough in the bundt pan.
  • Bake for 20-25 minutes or until the biscuits are a golden brown.
  • Remove from the oven and let rest for 3 minutes.
  • Take a knife and go around the edges and center of the bundt pan.
  • Flip the bundt pan onto a serving plate or dinner plate and the monkey bread should come right out.
  • Eat immediately for best taste.

Monkey Bread Tips

Spray your bundt pan liberally with nonstick spray. This will help the bread come out of the pan which finished.

Some people like to take their cinnamon sugar mixture and place in a large ziploc bag. Then add the dough pieces and shake to coat with the mixture. I find it easier to drop it in the bowl, but both techniques work fine.

I’ve also seen people frost their monkey bread with a royal or cream cheese icing. This bread is super sweet on it’s own. The icing helps it look pretty, but it’s not necessary unless you want a sugar explosion!

Finally, you can make this recipe without measuring anything. As long as you have enough butter to melt and completely coat your dough in the pan everything will turn out.

If you don’t have Thanksgiving or Christmas breakfast planned yet, this is your breakfast. It’s so good and you’ll end up making a second batch because it will be gone before you get a chance to try it.

The post The BEST Homemade Monkey Bread appeared first on The Happy Housewife™ :: Cooking.


from The Happy Housewife (Full Feed) https://ift.tt/35jhMqL

Monday, November 9, 2020

Do you know what you want?

If you don’t know what you want, how do you know what to ask for? How do you know what to look for? Yesterday afternoon I watched the film, The Secret: Dare to Dream. I’d been curious about the movie since its release, but too cheap to pay to watch it. Until I saw it […]

The post Do you know what you want? appeared first on Life As Mom.


from Life As Mom https://ift.tt/3lks0Nu

Wednesday, November 4, 2020

Organize your shelves and drawers with these inexpensive organizer bins to keep everything in its place! Thrifty Decor Chick

Organize your shelves and drawers with these inexpensive organizer bins to keep everything in its place! Thrifty Decor Chick

from Cleaning and Organizing https://ift.tt/2TUWHNa

Wood Bead Garland

Wood bead garland is a beautiful decor element that you can add anywhere in your home. Personally I love the beaded garland during the holidays, but I’ve even seen them used as keychains.

The nice thing about this DIY project is that ANYONE can do it. Even my eight year old niece created an adorable garland for her bedroom while we were working on the last craft project.

Aside from the beads, you probably have all the project supplies already in your home. For this craft I used acrylic paint, but next time I think I’m going to try a chalk spray paint to make it go quicker.

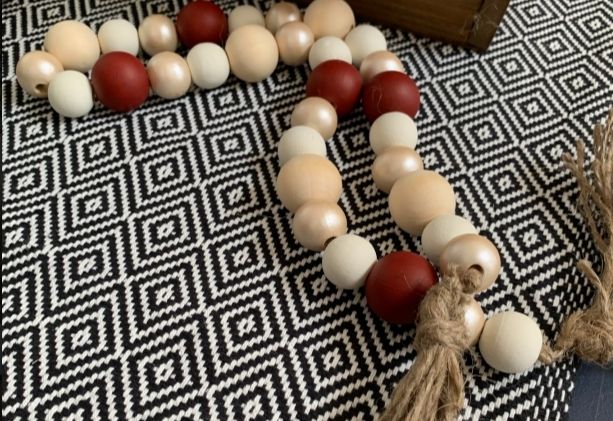
The only downside of this craft is that it did take me about 2 hours to paint all the beads (I gave each bead 3 coats of acrylic paint). I found when using a dark color, like red, I needed to go over it multiple times because the wood from the bead was bleeding through.

In the wood bead garland I made (pictured above) I used the following acrylic colors. White, red (but I mixed the red with a drop of black paint to get it a deeper color, natural beads, and champagne metallic. I highly recommend adding a metallic paint color to your garland as it gives it such a pretty shimmer.

You can also dilute your acrylic paint with a little bit of water to give it more of a transparent finish. I recommend doing this if you want some of the natural wood to bleed through.

Wood bead garland DIY

I prefer multi-size wooden beads to give the craft more dimension, but you can use the same size and use variations of color instead. (Or do both like I did!)

Amazon sells packages of beads in various sizes so you don’t have to buy multiple packs.

Print

Wood Bead Garland

Wooden beads make a beautiful garland for the holidays or to add a pop of color to any home decor. This project is very easy and can be completed in an afternoon.
Prep Time 1 minute
Cook Time 1 hour
Servings 1 Garland

Ingredients

Instructions

  • If you are using various sized beads in your wooden garland lay them out on a table to figure out your pattern first.
  • Once you have your pattern it's time to paint your beads.
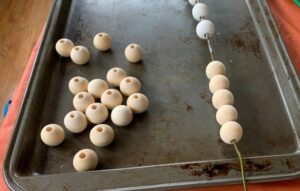
  • If you are painting your beads with a small paintbrush and acrylic paint I recommend using a coat hanger to string your beads to make it easier to paint. If the beads touch a surface while the paint is wet it will leave marks on the bead and they won't be smooth.
    wooden bead garland
  • Straighten out the coat hanger and then lay it across a raised surface to give yourself space to paint the beads. (We used a cookie sheet with sides)
  • Space the beads evenly on the coat hanger and paint each bead making sure to get all the sides and around the bead opening.
  • Repeat until the beads are evenly painted.
  • Allow beads to dry completely before removing from the coat hanger.
  • String the beads on a piece of twine, remember to make your pattern.
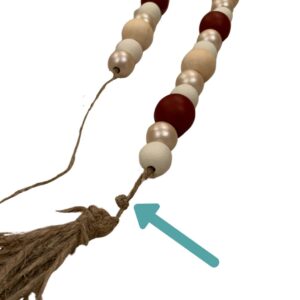
  • Once the beads are strung, tie a knot at the end of the twine. Make sure there is about a 1/2 inch of space between the beads and the knot in the twine. Don't cut the twine at the knot- keep another 3-4 inches after the knot so you have room to make the tassel.
  • To make the tassel, take your roll of twine and wrap a long strand around your hand or index card at least 10 times. Cut the end of the twine. Using the twine at the end of your bead garland, wrap that around the loop of twine to secure the loop.
    twine knot wooden garland
  • Secure a knot around the loop then cut the other side of the loop to make the tassel.
  • Wrap the extra twine around the top of the tassel (where it is connected to the wooden bead garland) to finish the tassel.
  • If you want to add decorative ribbon to the tassel, add it after the twine has secured the tassel to the garland.

Bead Garland Tips

Use various sized beads and paints. I used a pattern of small beads (different colors) and then a large bead for my design.

If you are using multiple colors paint each color separately. Then is the beads accidentally touch while drying you won’t have a splotchy wooden bead.

I used a small paperclip to move the beads while I was painting them so I didn’t smudge the paint. I stuck the paperclip in the hole to slowly turn the bead while I painted it.

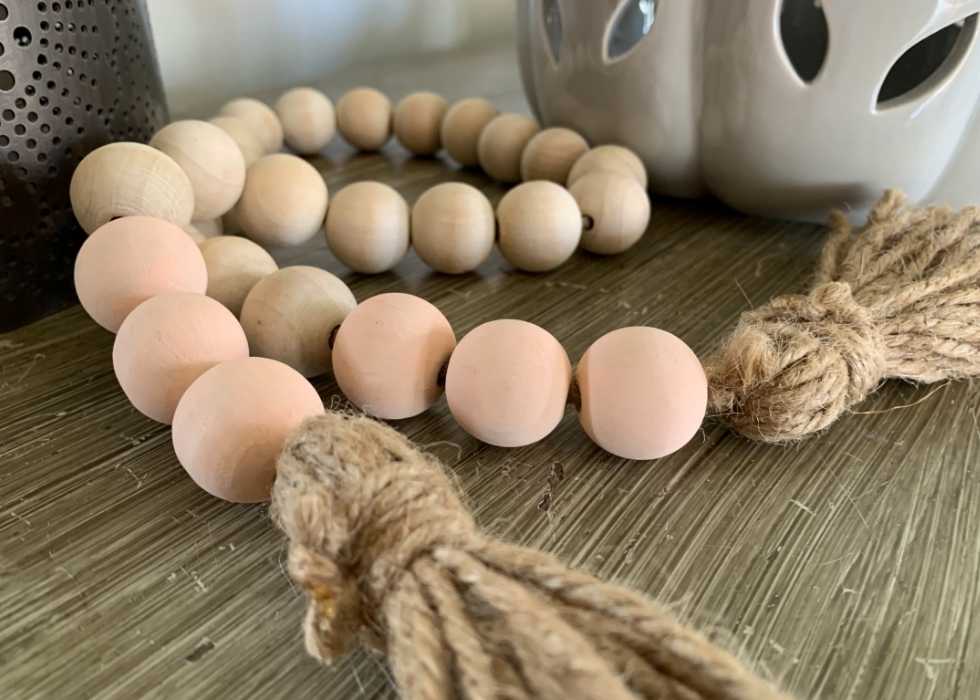
Keep some beads natural in your pattern. It’s less work to paint all of them and the natural wood makes a gorgeous farmhouse style wood bead garland.

Natural Wood bead garland

Use a piece of tape to keep the end of the twine from fraying while threading your wooden bead garland. This is a life saver as the twine frays very easily.

What I love about the garland is that it is so easy to make and you can create a different one for every holiday.

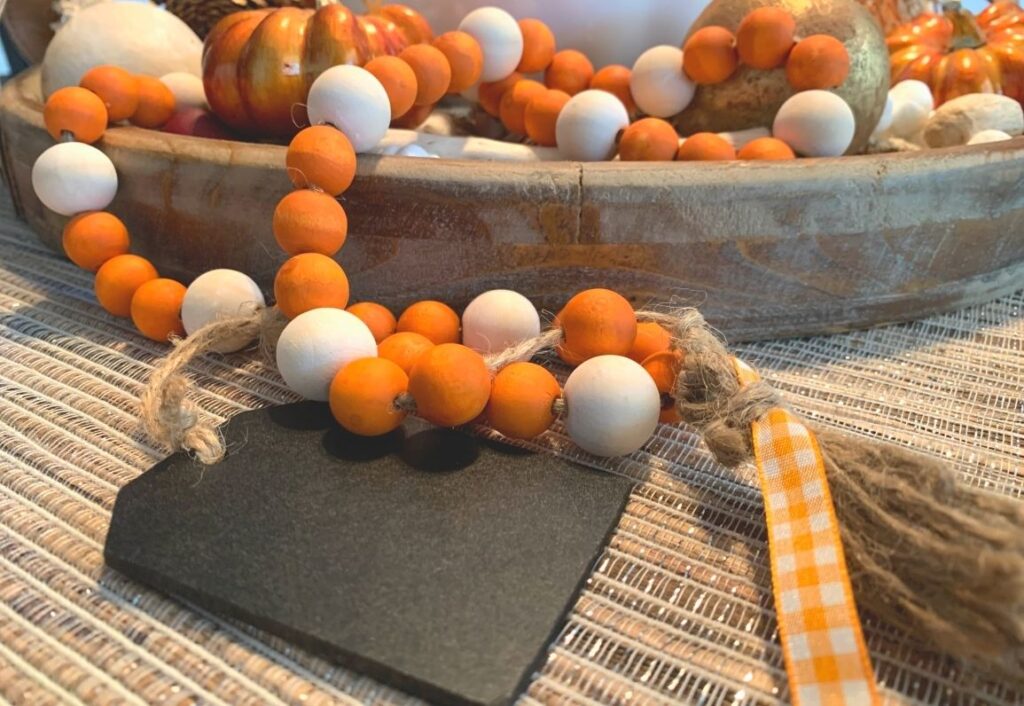
This Thanksgiving bead garland has a little chalkboard cut out on the end of it. You can write a message of gratitude on it for family and friends.

wooden bead garland

Available on Amazon

If you are not a DIY’er you can purchase wood bead garland at Hobby Lobby, Target, or even Amazon. Their prices on the natural wood garland is about the same as making it yourself. The garland in the picture below is $9 on Amazon.

However if you want to paint the bead garland you’ll need to purchase a package of beads separately and string them yourself since the beads are too close together to paint.

I recommend making several different garlands and mixing the natural wooden garland with painted garland for a beautiful farmhouse look.

The post

Wood Bead Garland appeared first on The Happy Housewife™ :: Home Management.   

Related Stories


from The Happy Housewife (Full Feed) https://ift.tt/364X8dm

Sunday, November 1, 2020

5 Ways to Save on Christmas Expenses

Looking to save on Christmas expenses this year? You can totally cut back, save money, and still enjoy a great holiday. Here are some easy ways to save. This year has been incredibly wacky, with finances feeling very uncertain for many. All the more reason to be on the ball when it comes to holiday […]

The post 5 Ways to Save on Christmas Expenses appeared first on Life As Mom.


from Life As Mom https://ift.tt/2ADacWQ

Saturday, October 31, 2020

Celebrate Simply

Would you like to celebrate the season more simply this year? Take this intensive 2-week workshop to help you streamline your celebrations to suit your season of life. Years ago when we had one child and a really tight budget, I decided that I was going to make all our Christmas gifts, all our Christmas […]

The post Celebrate Simply appeared first on Life As Mom.


from Life As Mom https://ift.tt/2J8Npql