Showing posts with label The Happy Housewife (Full Feed). Show all posts

Wednesday, November 11, 2020

The BEST Homemade Monkey Bread

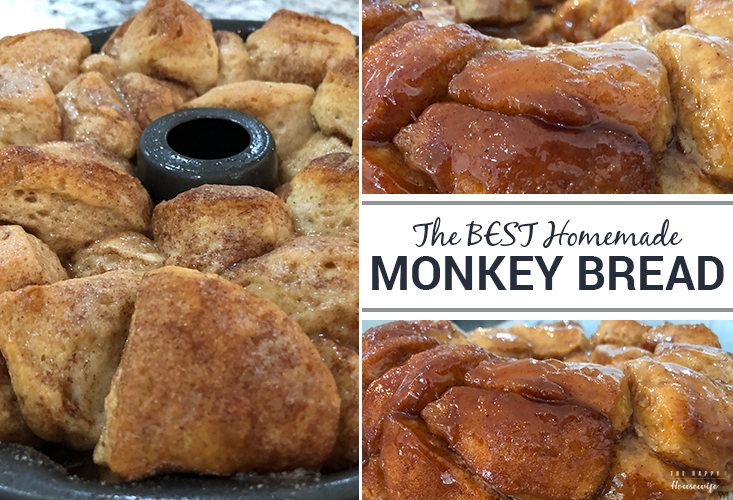
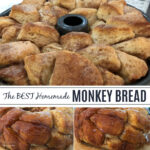
I recently made monkey bread (or pull-apart cinnamon bread it seems to have different names) and I forgot how much my kids LOVED it.

From the time I took it out of the oven, until the plate was completely empty was under 5 minutes. My kids devoured this!

While monkey bread is definitely not a healthy breakfast it is a fun breakfast to make for special occasions. It’s also so much easier to make than traditional cinnamon rolls and quicker too!

homemade monkey bread

Some people… who I personally believe are crazy, like to add things like nuts and raisins to this recipe. If someone tries to add raisins, run away as fast as you can. Those are not my people and they shouldn’t be your people either. I can kind of get on board with the nuts but my kids would revolt.

You can make this recipe from scratch, using homemade biscuits. But if I’m taking a short cut I’m taking a complete short cut! I use canned biscuits, get the store brand or whatever is cheapest.

You can use any kind, but the non flaky biscuits work best for monkey bread.

Best monkey bread
Print

Monkey Bread

This gooey cinnamon and sugar bread is a favorite on holiday mornings.
Course Breakfast
Cuisine american
Keyword breads
Prep Time 10 minutes
Cook Time 20 minutes
Servings 8 people
Cost $8

Equipment

  • Bundt pan

Ingredients

  • 2 cans biscuits
  • 2/3 cup sugar
  • 2 tsp cinnamon
  • 1 stick butter
  • 1/2 cup brown sugar

Instructions

  • Preheat oven to 350 degrees.
  • Spray bundt pan with nonstick spray.
  • Open cans of biscuits and cut each biscuit into four pieces (like you are cutting a pie or a pizza)
  • Take cinnamon and white sugar and combine in a small bowl.
  • Take each piece of biscuit dough and roll in the cinnamon sugar mixture until coated.
  • Place in the bundt pan. Continue until all the biscuit pieces have been used.
  • Sprinkle any remaining cinnamon and sugar mixture over the dough in the pan.
  • Melt the butter and stir in the brown sugar.
  • Pour over the biscuit dough in the bundt pan.
  • Bake for 20-25 minutes or until the biscuits are a golden brown.
  • Remove from the oven and let rest for 3 minutes.
  • Take a knife and go around the edges and center of the bundt pan.
  • Flip the bundt pan onto a serving plate or dinner plate and the monkey bread should come right out.
  • Eat immediately for best taste.

Monkey Bread Tips

Spray your bundt pan liberally with nonstick spray. This will help the bread come out of the pan which finished.

Some people like to take their cinnamon sugar mixture and place in a large ziploc bag. Then add the dough pieces and shake to coat with the mixture. I find it easier to drop it in the bowl, but both techniques work fine.

I’ve also seen people frost their monkey bread with a royal or cream cheese icing. This bread is super sweet on it’s own. The icing helps it look pretty, but it’s not necessary unless you want a sugar explosion!

Finally, you can make this recipe without measuring anything. As long as you have enough butter to melt and completely coat your dough in the pan everything will turn out.

If you don’t have Thanksgiving or Christmas breakfast planned yet, this is your breakfast. It’s so good and you’ll end up making a second batch because it will be gone before you get a chance to try it.

The post The BEST Homemade Monkey Bread appeared first on The Happy Housewife™ :: Cooking.


from The Happy Housewife (Full Feed) https://ift.tt/35jhMqL

Wednesday, November 4, 2020

Wood Bead Garland

Wood bead garland is a beautiful decor element that you can add anywhere in your home. Personally I love the beaded garland during the holidays, but I’ve even seen them used as keychains.

The nice thing about this DIY project is that ANYONE can do it. Even my eight year old niece created an adorable garland for her bedroom while we were working on the last craft project.

Aside from the beads, you probably have all the project supplies already in your home. For this craft I used acrylic paint, but next time I think I’m going to try a chalk spray paint to make it go quicker.

The only downside of this craft is that it did take me about 2 hours to paint all the beads (I gave each bead 3 coats of acrylic paint). I found when using a dark color, like red, I needed to go over it multiple times because the wood from the bead was bleeding through.

In the wood bead garland I made (pictured above) I used the following acrylic colors. White, red (but I mixed the red with a drop of black paint to get it a deeper color, natural beads, and champagne metallic. I highly recommend adding a metallic paint color to your garland as it gives it such a pretty shimmer.

You can also dilute your acrylic paint with a little bit of water to give it more of a transparent finish. I recommend doing this if you want some of the natural wood to bleed through.

Wood bead garland DIY

I prefer multi-size wooden beads to give the craft more dimension, but you can use the same size and use variations of color instead. (Or do both like I did!)

Amazon sells packages of beads in various sizes so you don’t have to buy multiple packs.

Print

Wood Bead Garland

Wooden beads make a beautiful garland for the holidays or to add a pop of color to any home decor. This project is very easy and can be completed in an afternoon.
Prep Time 1 minute
Cook Time 1 hour
Servings 1 Garland

Ingredients

Instructions

  • If you are using various sized beads in your wooden garland lay them out on a table to figure out your pattern first.
  • Once you have your pattern it's time to paint your beads.
  • If you are painting your beads with a small paintbrush and acrylic paint I recommend using a coat hanger to string your beads to make it easier to paint. If the beads touch a surface while the paint is wet it will leave marks on the bead and they won't be smooth.
    wooden bead garland
  • Straighten out the coat hanger and then lay it across a raised surface to give yourself space to paint the beads. (We used a cookie sheet with sides)
  • Space the beads evenly on the coat hanger and paint each bead making sure to get all the sides and around the bead opening.
  • Repeat until the beads are evenly painted.
  • Allow beads to dry completely before removing from the coat hanger.
  • String the beads on a piece of twine, remember to make your pattern.
  • Once the beads are strung, tie a knot at the end of the twine. Make sure there is about a 1/2 inch of space between the beads and the knot in the twine. Don't cut the twine at the knot- keep another 3-4 inches after the knot so you have room to make the tassel.
  • To make the tassel, take your roll of twine and wrap a long strand around your hand or index card at least 10 times. Cut the end of the twine. Using the twine at the end of your bead garland, wrap that around the loop of twine to secure the loop.
    twine knot wooden garland
  • Secure a knot around the loop then cut the other side of the loop to make the tassel.
  • Wrap the extra twine around the top of the tassel (where it is connected to the wooden bead garland) to finish the tassel.
  • If you want to add decorative ribbon to the tassel, add it after the twine has secured the tassel to the garland.

Bead Garland Tips

Use various sized beads and paints. I used a pattern of small beads (different colors) and then a large bead for my design.

If you are using multiple colors paint each color separately. Then is the beads accidentally touch while drying you won’t have a splotchy wooden bead.

I used a small paperclip to move the beads while I was painting them so I didn’t smudge the paint. I stuck the paperclip in the hole to slowly turn the bead while I painted it.

Keep some beads natural in your pattern. It’s less work to paint all of them and the natural wood makes a gorgeous farmhouse style wood bead garland.

Natural Wood bead garland

Use a piece of tape to keep the end of the twine from fraying while threading your wooden bead garland. This is a life saver as the twine frays very easily.

What I love about the garland is that it is so easy to make and you can create a different one for every holiday.

This Thanksgiving bead garland has a little chalkboard cut out on the end of it. You can write a message of gratitude on it for family and friends.

wooden bead garland

Available on Amazon

If you are not a DIY’er you can purchase wood bead garland at Hobby Lobby, Target, or even Amazon. Their prices on the natural wood garland is about the same as making it yourself. The garland in the picture below is $9 on Amazon.

However if you want to paint the bead garland you’ll need to purchase a package of beads separately and string them yourself since the beads are too close together to paint.

I recommend making several different garlands and mixing the natural wooden garland with painted garland for a beautiful farmhouse look.

The post

Wood Bead Garland appeared first on The Happy Housewife™ :: Home Management.   

Related Stories


from The Happy Housewife (Full Feed) https://ift.tt/364X8dm

Sunday, October 25, 2020

Halloween Treat Bag Toppers

If you are handing out candy to trick or treaters this Halloween, here’s a safe option that will keep little hands out of the candy bucket.

Instead of grabbing candy for each child individually this year, I’m pre-packaging the candy in Ziploc bags. However I wanted to give the bags a fun look without paying for halloween themed bags.

I created these cute printable treat bag toppers that easily staple or tape to the top of a snack size or sandwich size Ziploc bag.

All you need to do is put a few pieces of individually wrapped candy in each bag, then add a topper. There are four different designs that are perfect for trick or treaters.

I used the snack sized bags for the candy in the pictures, which holds about 3 pieces of candy. We don’t get many trick or treaters so that is the perfect amount.

To get all four treat topper designs enter your email address below. There are two designs per page.

To use the printable treat bag toppers, print using color ink. (The colors are super vibrant on these toppers so definitely print in color.) Then cut each topper out. Fold in half and staple or use tape to attach to the bags of candy.

trick or treat bag

To keep kids socially distant when trick or treating, place a small number of bags on a table on your porch or in front of your house. Each child grabs their bag and they aren’t touching all the candy in the basket.

These are also great for any fall parties your children might be participating in at school. Create a bag for each child and put their name on the back of the bag topper so they stay separated.

To grab your free printable enter your email address below.

Remember to check your inbox for your link to download the free printable.

Trick or Treat Bag Toppers
Enter your email to get your free printable toppers. 

The post Halloween Treat Bag Toppers appeared first on The Happy Housewife™ :: Home Management.


Related Stories


from The Happy Housewife (Full Feed) https://ift.tt/3ot1B1V

Thursday, October 8, 2020

Buffalo Plaid Check Coasters

Do you love buffalo plaid check as much as I do? I didn’t realize how much I liked this fabric until I visited my sister last fall.

She had used the buffalo plaid check in her fall decor and it looked amazing!

What I love about this print is that you can transition it from fall with pumpkins and gourds to winter with Christmas trees and reindeer.

Typically fall decor is orange, brown, and yellow so it can’t be repurposed for another holiday. But with the simple black and white of buffalo plaid check you can use it in your decorating from September to January.

This will save you money and time on your holiday decorations.

These plaid coasters are super easy to make and you don’t need to be a pro at sewing to make them.

They also make great homemade Christmas gifts for teachers, friends, or anyone who hates water stains on their tables.

You can use any fabric print you want and you don’t need a lot of fabric so this is a great way to use up those fabric scraps you’ve been saving.

You can also upcycle old napkins or placemats to make any fabric coasters. I do recommend using the batting, it’s cheap and you don’t need a lot of it. It helps absorb the water from glasses so it won’t seep through to your table.

If you can sew a straight line you can absolutely make these coasters. Once you make coasters you can use the same technique for making a table runner as well, it’s really that simple!

My sister has a buffalo plaid check table runner and it looks gorgeous on her wood kitchen table.

Print

Buffalo Plaid Check Coasters

Equipment

  • Scissors
  • Cutting Mat
  • Ruler
  • Sewing machine

Ingredients

  • Flannel Fabric
  • Batting

Instructions

  • Cut two 5 inch x 5 inch squares from your flannel fabric and one 5 inch x 5 inch square from the batting.
    buffalo plaid check fabric coasters
  • Place the flannel fabric together with print sides facing towards each other, the batting on top and pin together.
    buffalo plaid check fabric coasters- low sew
  • Sew a 1/4 inch around leaving one side open to be able to flip right side out.
    buffalo check coaster tutorial
  • Turn the raw edges in on the unsewn edge and sew 1/4 inch all around the coaster for a finished look.
    buffalo plaid check fall decor
  • Finished!
    buffalo check coasters

These fabric coasters are washable, but make sure you wash them on delicate and lay them flat to dry.

The buffalo plaid check will add a beautiful festive look to your home from Halloween until Christmas.

You might also like…

The post Buffalo Plaid Check Coasters appeared first on The Happy Housewife™ :: Home Management.


from The Happy Housewife (Full Feed) https://ift.tt/34FM6dG

Tuesday, October 6, 2020

Properties of Water Experiments

Water. It’s one of the basic elements of life. Living things need it every day to survive. It seems that water is everywhere and in all facets of life. We drink, bathe, and play in it. Sometimes, we take it for granted.

Since water is everywhere, let’s learn more about the properties of water and test them with a few simple experiments.

The Properties of Water

It seems that water is everywhere and in all facets of life. We drink it. We bathe in it. We play in it. We often take it for granted. Since water is everywhere, let's learn more about the properties of water and test them with a few simple experiments.

The Water Molecule

Scientifically speaking, water is a cool molecule to study.

Properties of Water Experiments at The Happy Housewife

Water is a polar molecule. Even though water is a neutral molecule in that it has an equal number of protons and electrons, there is an uneven electron distribution within each water molecule that makes it polar.

The oxygen atom in a water molecule attracts electrons more strongly than hydrogen does. This means that electrons tend to be at the oxygen end of the molecule. This makes the oxygen end of the molecule slightly negative. Thus, the hydrogen end of the molecule is slightly positive.

This polarity of water gives it some special properties, like cohesion and adhesion, that you can easily demonstrate right in your kitchen.

Cohesion Properties of Water

Cohesion simply means that water molecules like to stick to each other. This is caused by the slightly negative charge of the oxygen atom of one water molecule being attracted to the slightly positive charge of the hydrogen atoms of another water molecule.

Properties of Water Experiments at The Happy Housewife

Surface tension is a good example of cohesion at work. Have you ever seen a water skipper “skate” across the water of a pond? This insect literally walks on water because it takes advantage of the surface tension of water. Water molecules hold together tight enough to let these insects stay on top of the water.

Properties of Water Experiments at The Happy Housewife

You can test surface tension by filling a glass with water and gently laying a needle on the surface of the water using a fork. Since the needle has a higher density than water, it will sink if just dropped in the water. However, if the surface tension is not broken, the needle can be placed on the water in such a way that the surface tension of the water holds the needle on the surface.

Properties of Water Experiments at The Happy Housewife

Cohesion can also be tested by filling that same glass of water to the top and then gently adding more and more water until the water is actually forming an arc of water slightly over the top of the glass. The cohesive properties of the water are holding the molecules together so that they will not spill over the top of the glass. The weak hydrogen bonds between the water molecules will eventually give way.

Adhesion Properties of Water

Water molecules are attracted to each other (cohesion). They are also attracted to other charged molecules. This is adhesion. You can see this when it rains and water drops form on windows. These drops should be pulled to earth by gravity, but the force of the adhesion of water to that surface is stronger.

Properties of Water Experiments at The Happy Housewife

You can test adhesion by dipping a paper towel into a small bowl of water and food coloring. Watch the colored water as it climbs up the towel against gravity. Once again, the water molecules are drawn to other molecules and overcome the force of gravity.

What ways can you and your kids think of to test cohesion and adhesion?

Properties of Water Worksheet

Download this free worksheet to use in your water lesson and record your experiments.

It seems that water is everywhere and in all facets of life. We drink it. We bathe in it. We play in it. We often take it for granted. Since water is everywhere, let's learn more about the properties of water and test them with a few simple experiments.

Download your free worksheet


This inexpensive book is probably available at your local library or on Amazon if you are looking for more water experiments and homeschool lessons.

Learn more about water…

    Learning About the Water CycleSink or Float ExperimentSummer Cloud Science

The post

Properties of Water Experiments appeared first on The Happy Housewife™ :: Home Schooling.


Related Stories


from The Happy Housewife (Full Feed) https://ift.tt/3iBv4m3

Tuesday, September 29, 2020

Skillet Cookie

Every year on my nephew’s birthday his mom buys him a cookie cake. I absolutely love cookie cake and never knew how easy it was to make my own. This skillet cookie recipe is made in a cast iron skillet but you can use any 10 inch skillet that is oven safe.

A skillet cookie is almost the same as making blondies (yum!) but using the skillet keeps the cookie in its original cookie shape.

how to make a giant chocolate chip cookie
Print

Skillet Cookie

Prep Time 10 minutes
Servings 4

Ingredients

  • 1 Cup Butter Unsalted
  • 3/4 Cup Granulated Sugar
  • 3/4 Cup Light Brown Sugar Firmly packed
  • 2 Large Eggs
  • 2 tsp Vanilla Extract
  • 2 1/2 Cups All-Purpose Flour
  • 1 tsp Baking Powder
  • 3/4 tsp Salt
  • 1/4 tsp Baking Soda
  • 1 1/2 Cups Chocolate Chips Semi-sweet, dark, or milk

Serving

Instructions

  • Preheat the oven to 350 degrees F
  • In a large bowl, cream together butter and sugars until light and fluffy
  • Beat in eggs and vanilla until smooth
  • In a small bowl, whisk together flour, baking powder, salt and baking soda
  • Gradually add flour mixture to wet mixture, scrape down the sides of the bowl after each addition
  • Stir in chocolate chips, reserving a handful for the top
  • Spread the dough evenly in a 10 inch skillet and scatter the reserved chocolate chips on top
  • Bake until the center is cooked through, about 25-30 minutes or until a toothpick inserted comes out clean
  • Remove from oven and cool slightly
  • Serve warm with vanilla ice cream and toppings if you like
    how to make a giant chocolate chip cookie

Typically skillet cookie cakes have either frosting or ice cream as a topping. I love a warm cookie or brownie with vanilla ice cream on top, but buttercream frosting is great for a birthday.

You might also like…

The post Skillet Cookie appeared first on The Happy Housewife™ :: Cooking.


Related Stories


from The Happy Housewife (Full Feed) https://ift.tt/3cHiv7d